")
In the age of remote work, professional headshots are becoming increasingly important for making a good first impression online. In this article, we’re going to teach you how to create a DIY professional headshot with an iPhone. (Or any high-end smart phone.)
You won’t even need a fancy office in the background background or professional lighting, because this guide covers how to take a professional headshot at home…and STILL make it look good.
While the quality of the photo may not exactly match a photography session at a studio, the photos you will take in this guide will be 50x better than most selfies and other low-quality photos on LinkedIn these days.
At the end of this guide, we’ll also tell you how you can take your smart phone or iPhone headshot to the next level with our remote professional editing services.
If you prefer to watch a video vs read our step-by-step guide, scroll down to see the Youtube video with this same material covered by me.
Notes: Did you already take a DIY headshot with a smart phone, and are just wondering how to make it look more professional? Click here to learn about our Virtual Headshot Editing Services for remote teams and individuals. We can retouch your photo (white teeth, remove acne, remove stray hairs etc) and replace the background. Packages for individuals start at $49.
6 Steps for How To Take A Professional Headshots At Home
NOTE: Before we get started, you may be wondering if you need the most expensive/up-to-date iPhone to take a decent professional headshot. Luckily, you don’t need the latest gadget to take a professional headshot at home. You can actually use any high-end smart phone created in the last 3 years.
Models that work include Google Pixel, Samsung Galaxy, and other high-end androids. As long as your phone has a reasonably good camera, and was made within the last three years, you’re going to be OK.
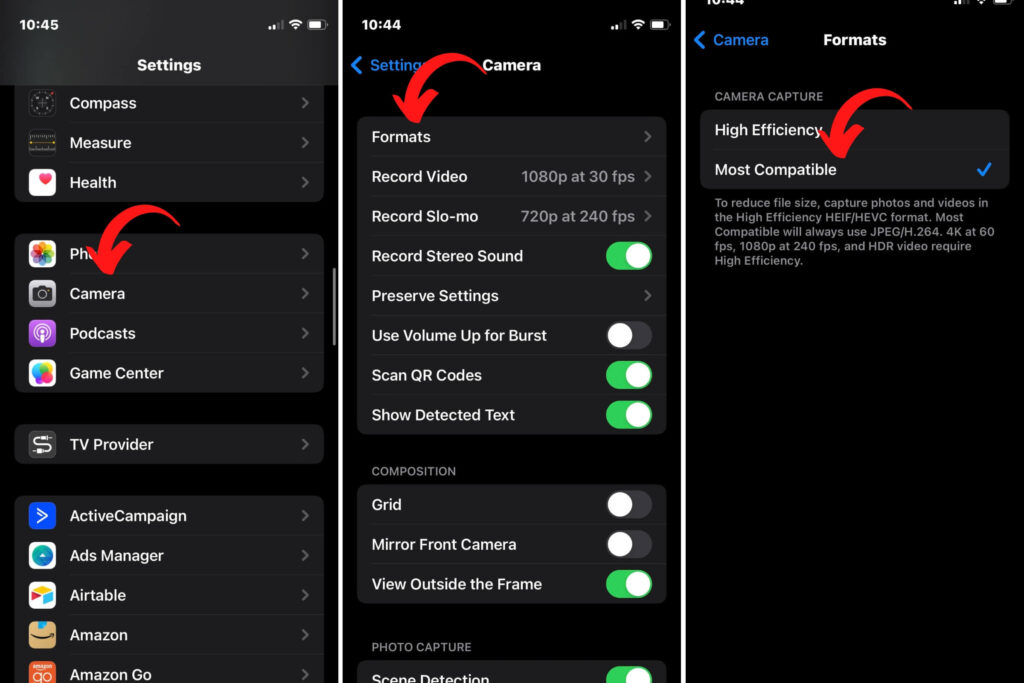
However, if you ARE taking your headshot with an iPhone, you need to change your camera settings before getting started. iPhones automatically shoot in a file format called “.HEIC”, which isn’t ideal for professional headshots at home.
With that said, let’s get rolling! And, if you prefer to watch vs read, you can watch our Youtube video summary below:
Step #1: Prep For Your DIY Professional Headshot Shoot
What to Wear:
Please see our article below on what to wear for your professional headshot. In short, solid colors look best. Make sure your clothing is wrinkle-free and appropriately positioned (collars in particular).
Take a look at our guide on the topic here: How to Dress for Business Headshots
Avoid company logos and bold patterns. These types of tops are distracting.
For the purposes of making a good first impression online, we’d HIGHLY recommend not wearing a regular t-shirt or hoodie in your photo. A collared shirt, sweater, or anything a step above casual/pajamas will make a MUCH better impression on people.
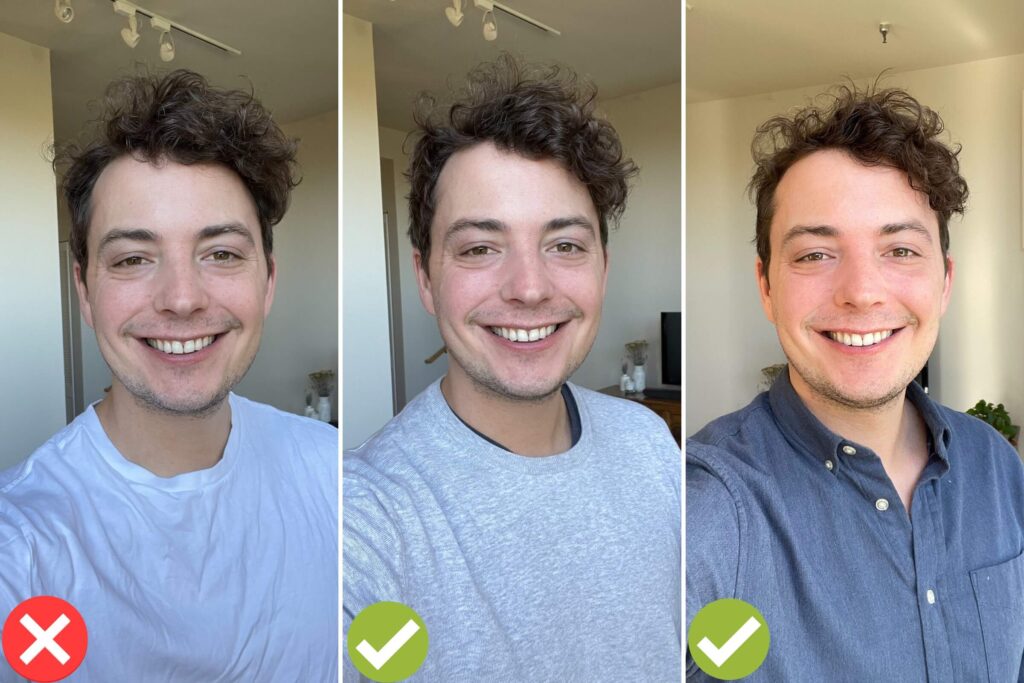
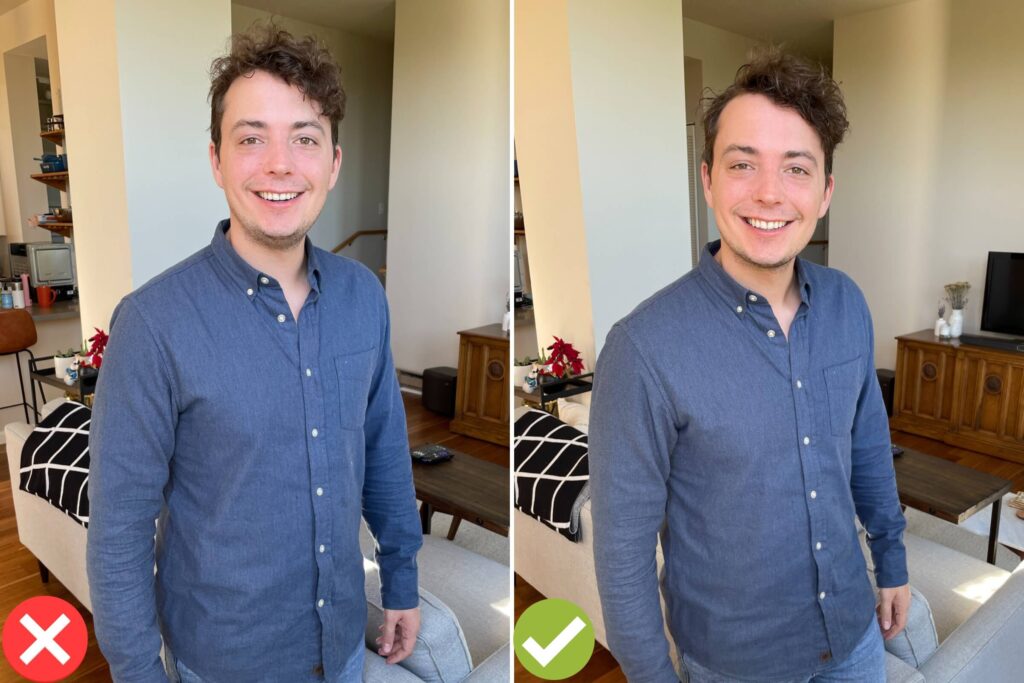
For your at-home headshot, you’ll also want to consider your background. Try to wear an outfit that has high contrast with your background. A light-toned shirt with a dark blazer is a classic professional look – and if you have the standard off-white walls, will help you stand out nicely.
How to Style Hair:
Make sure your hair is styled exactly how you like it. We’d avoid haircuts that are unusual for you or likely to look messier than intended. For stray hairs, a little hair spray or water can go a long way.
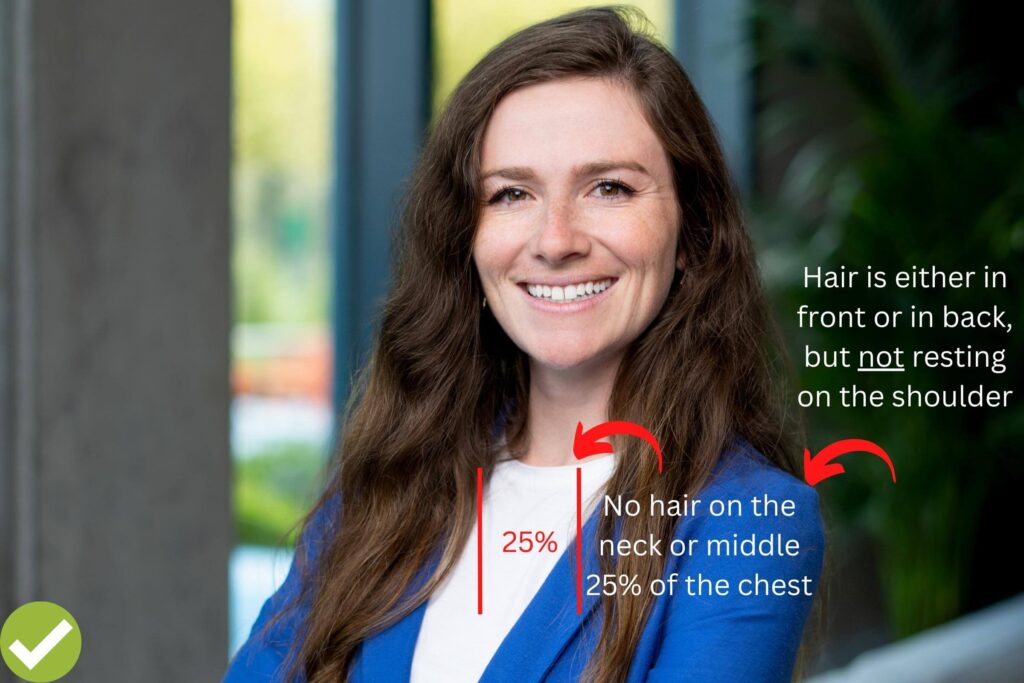
If you have long hair, make sure it isn’t resting on your shoulders or the middle 25% of your chest. You can try some photos with your hair forwards on both sides, plus some versions with your hair back over your shoulder on the side closest to the camera.
Typically, but not always, client’s prefer their hair back on the nearest side because the final photo looks more neat.
Makeup:
If you wear makeup, we recommend simple makeup that you’d wear to a business meeting. Avoid the temptation to “overdo” it — our editors can remove acne and minimize other blemishes via editing, but we can’t remove makeup.
Jewelry:
Like makeup, keep jewelry simple. Complex or large jewelry may become distracting.
Glasses:
When taking your photos, try to avoid using glasses that have a significant amount of glare when facing any form of light.
Skin Prep:
If you typically have oily skin, you should use a dry paper towel to pat the areas in the middle of your forehead, nose, cheeks and chin. Sometimes, shiny parts of our face can look distracting for your final at-home headshot. And, while we can somewhat edit shine away (discussed later), the photos look much better without shine in the original version.
Facial Hair:
If you have facial hair and want to shave for your photo, we’d recommend shaving the night before. If you shave on the same day, you may get razor bumps and irritation.
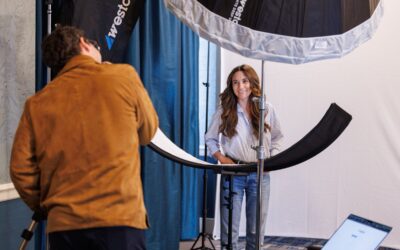
Step 2: Scope Out Your Home Lighting
Ideal lighting should come from sunlight or sunlight “diffused” (aka scattered) through clouds, a silk window curtain, or reflected off of a big white wall. You should never take your photo with sunlight directly hitting your face, as it will blind you and create harsh shadows on your face.
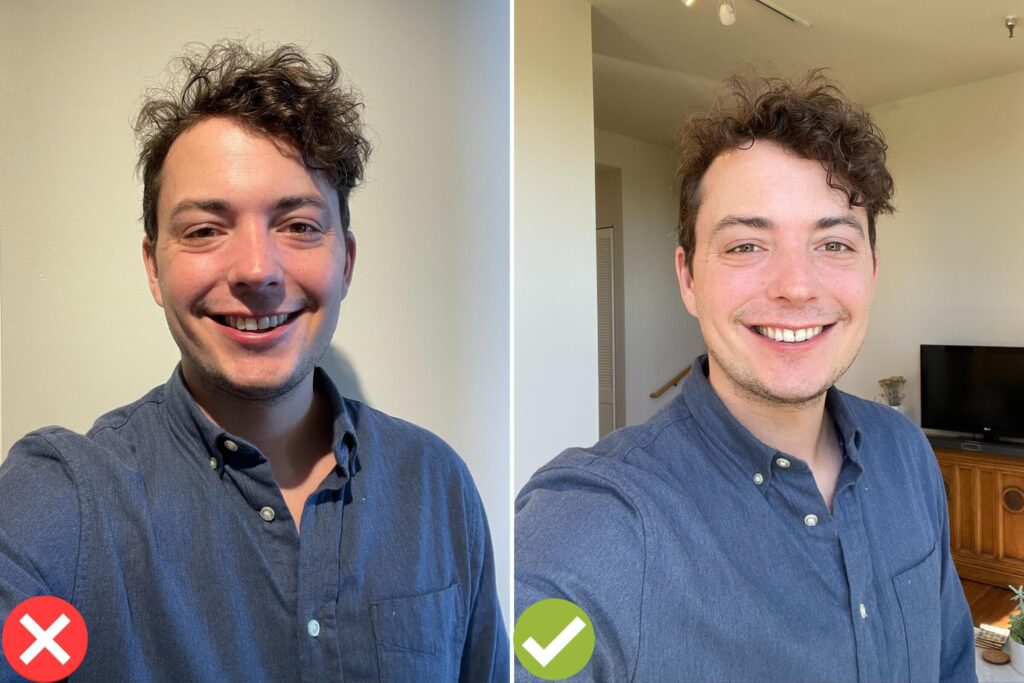
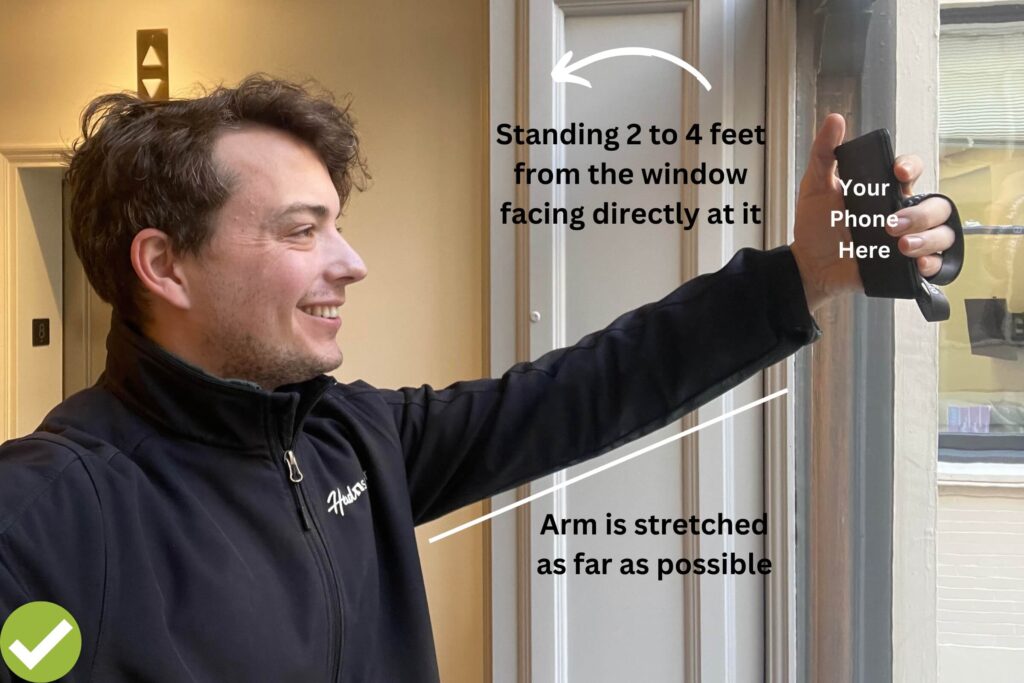
Typically, the best light can be found near a large window, with you directly facing towards it. If you have no silk curtains and the sun is fully shining through the window (so that it’s hitting you directly), then you should either back away from the window or wait until later in the day.
Because you’re taking your professional headshot at home, avoid any overhead lights. The color of the indoor electrical lighting (called “color balance” in photography) will make your skin tone look yellow in your photo. So, for whichever location you choose to shoot your photos, make sure to turn off all indoor lights.
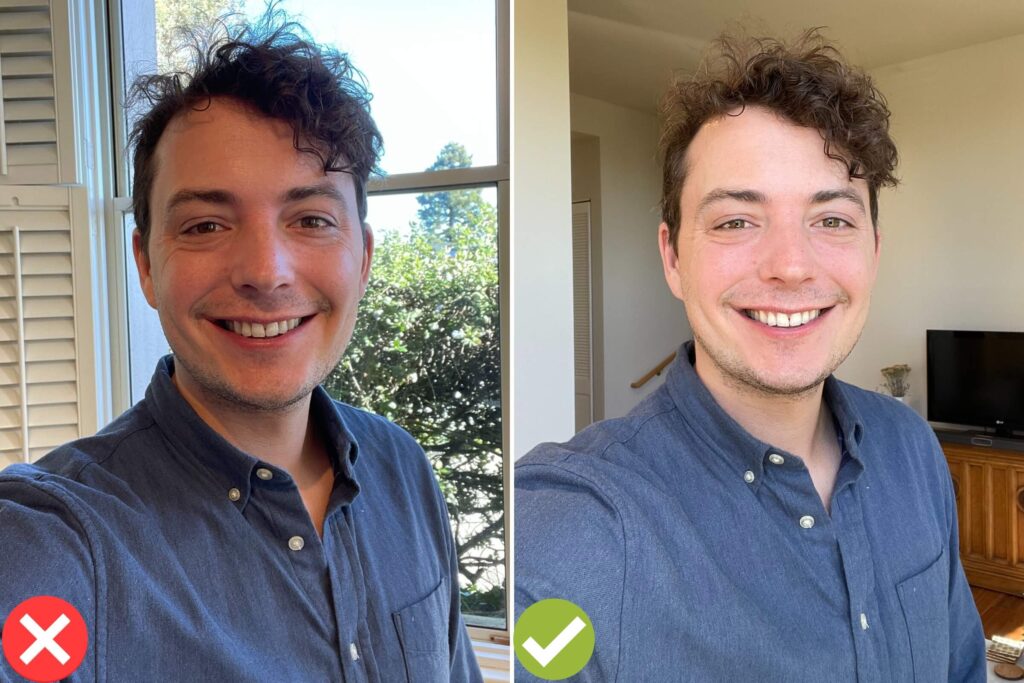
The light from the window should create even lighting across your body, with minimal distracting shadows.
If you’re unsure, take a couple selfies in different windows at different times of day – then compare the results. Remember, you want to be facing directly into the light, and not too far from the window!
If you stand too far away from the window, your phone will compensate by cranking up a setting called “ISO”. In short, ISO help your camera take photos in low levels of light, but ultimately the photos are grainy. Grainy photos make for bad headshots!
If you don’t have a window with good lighting, then you can also go outdoors for your DIY headshot. Look for a location that’s in the shade, but not TOO dark.
[Example of Outdoor Photo Coming Soon]
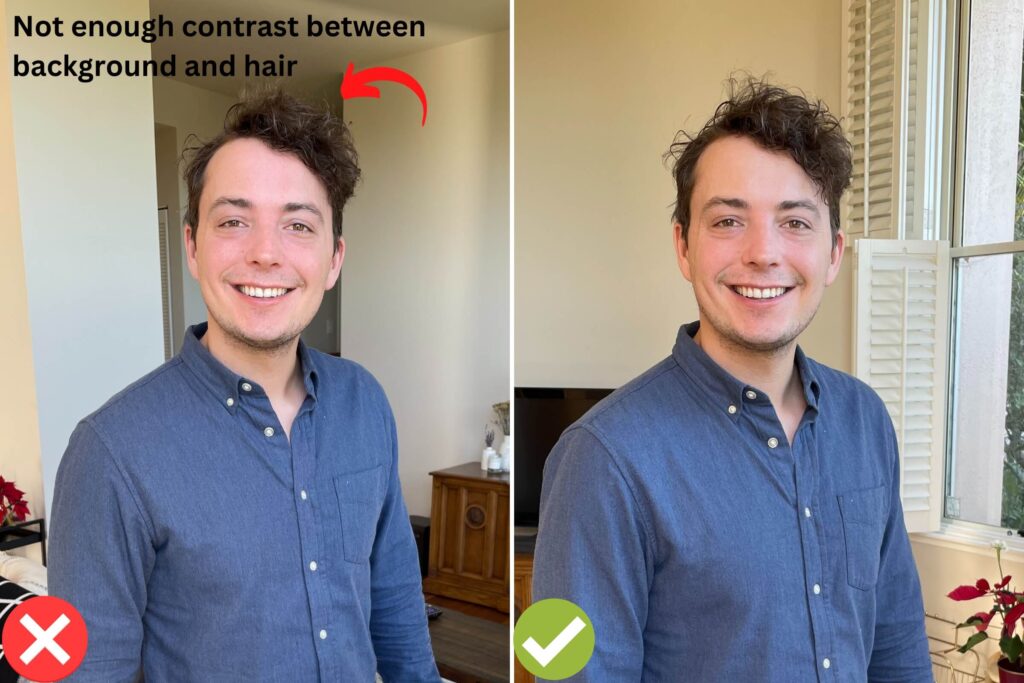
As the last thing to consider when looking at where you’ll stand for your smart phone headshot, try to angle yourself so that your hair and clothing have contrast with the background of the photos. This factor is less important than standing directly in front of the light source though.
You DON’T need to be standing directly against a wall if that means you don’t have good lighting. Prioritize the lighting on your face/body.
Later in the article, we’ll show you how we can replace the background of your photo via our Virtual Headshot services. But, in order to do that, the photo needs to have contrast between your clothing/hair and the background. (Or, the hair will look fake in your final photo.)
Step 3: Recruit Your Smart Phone Headshot ”Photographer”
While a professional camera will produce a much higher-quality photo, shooting your professional headshot using an iPhone is great in a pinch (i.e. MUCH better than using a selfie on an important job application…)
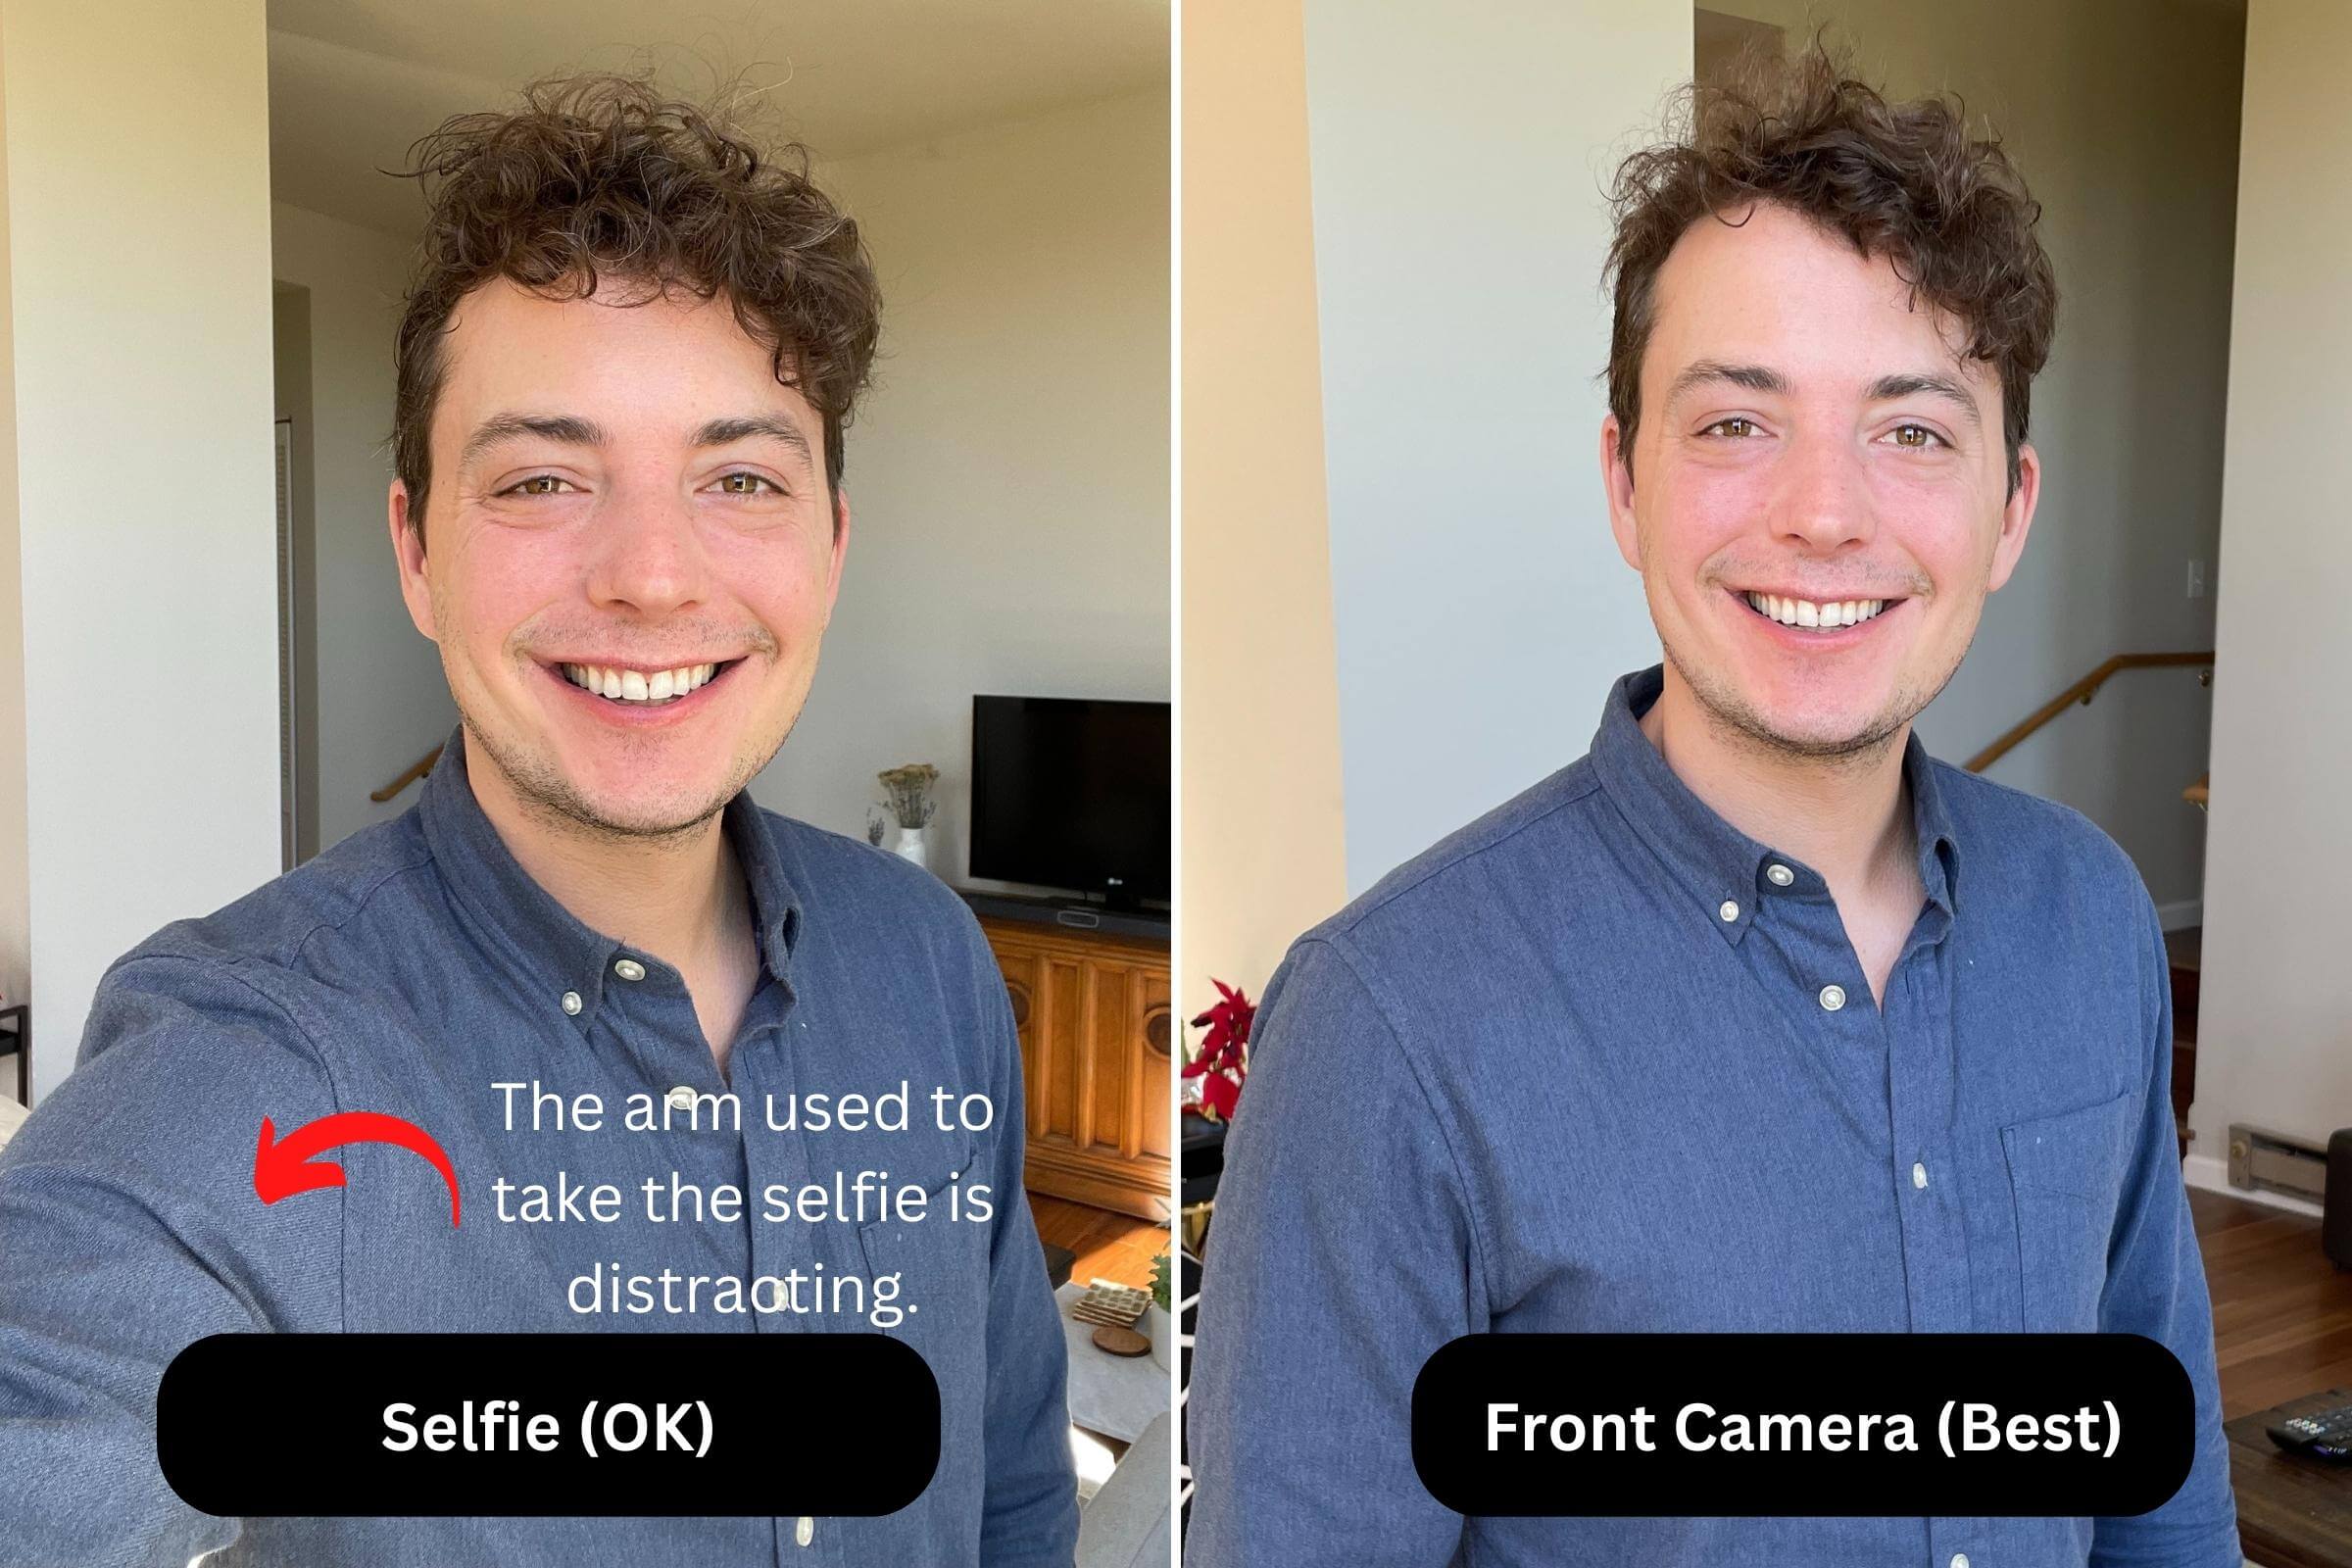
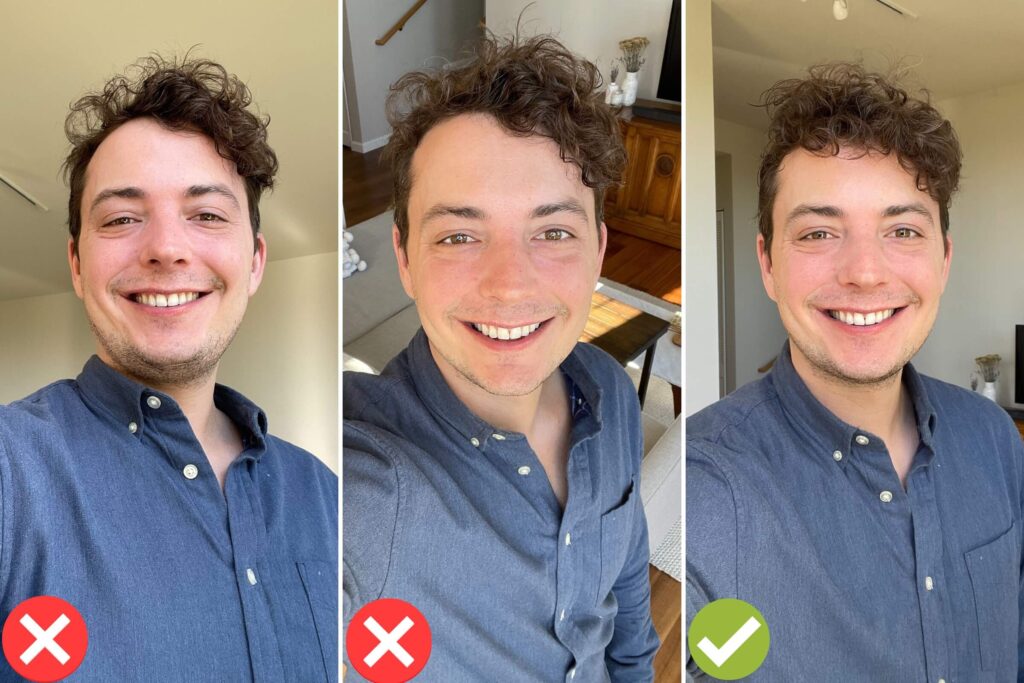
Ideally you would have a spouse, friend or coworker take your photo with the forward-facing camera on your phone. The “selfie” function using your arm is the next-best option. The “selfie” camera is a “wide-angle” lens that can distort your face. So the quality on the forward-facing camera is typically much higher.
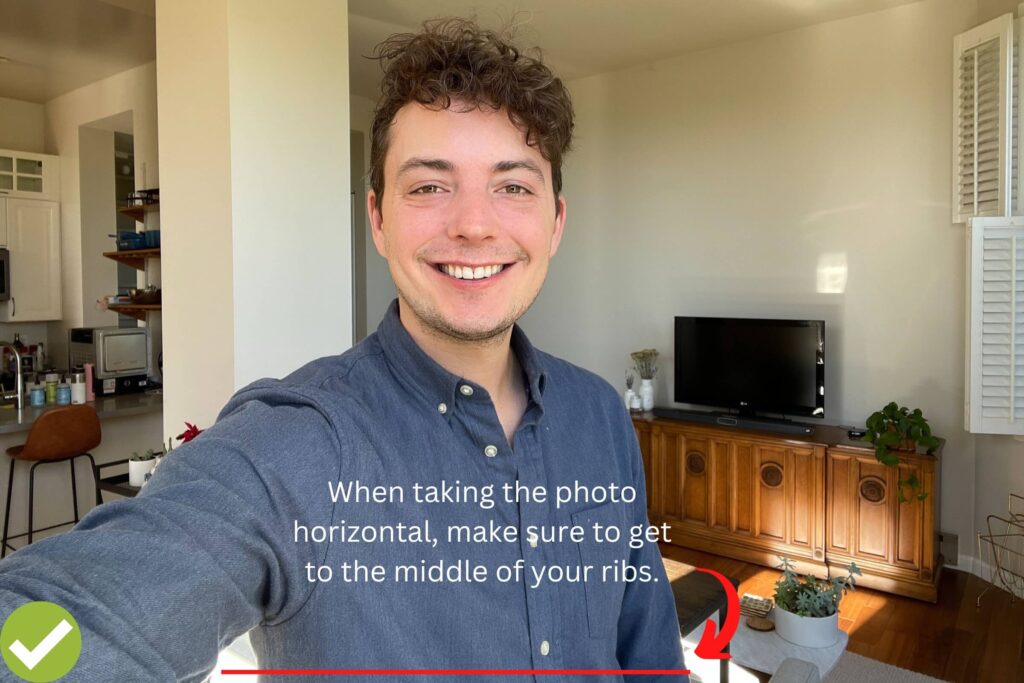
This is worth re-iterating in bold text. Having a friend, coworker, or roommate take your photo with the front-facing camera will produce a MUCH better headshot. While many of the examples on this page are selfies, they are for instructional purposes only. The selfie is a last resort. If you’re taking the photo as a selfie, MAKE SURE to take the photo with the camera horizontal and AT LEAST the middle of your ribs showing.
If taking a “selfie,” then pay special attention to making sure your arm is as far away from your body as possible (so that you can follow the “crop instruction” below).
You can 100% take a selfie headshot using an iPhone or other smartphone, but the results from using your forward-facing camera will be higher-quality.
Ask the photographer to keep an eye on your hair and collar. Make SURE they don’t mess with your phone camera settings or change the zoom on your phone. The lens should be at it’s normal zoom level.
Besides the photo quality, humans are notoriously bad at selecting photos of ourselves, so any candid feedback will help. If you can, pick someone who is enthusiastic and willing to take several photos.
When you recruit your photographer, instruct them to take the photo from your eye-level height and tilted slightly downwards.
Step 4: Take Professional Photos with Your iPhone
When starting you shoot, do not turn on “Portrait Mode” or any other mode that interferes with the camera. Leave the camera on its regular “photo” settings for the best result.
While you’re looking at your camera, make sure that your camera lens is perfectly clean. When your phone is in your pocket, dirt can accumulate on your lenses. So, you can use Windex or another lens cleaner to gently wipe your lenses to make sure you get a sharp image. To avoid scratching your lens, use a soft clothe (like old t-shirt) instead of a paper towel.
Crop:
Leave plenty of room on both sides of your photo for your shoulders, and leave at least a couple inches above the top of your head. If you cut off any portion of your body in the submitted photo, it’s impossible for you to add that back later.
If you’re having someone else take your photo (not a selfie), then make sure they take the photo from the waist up, but no further. A photo taken from too far away will have lower quality.
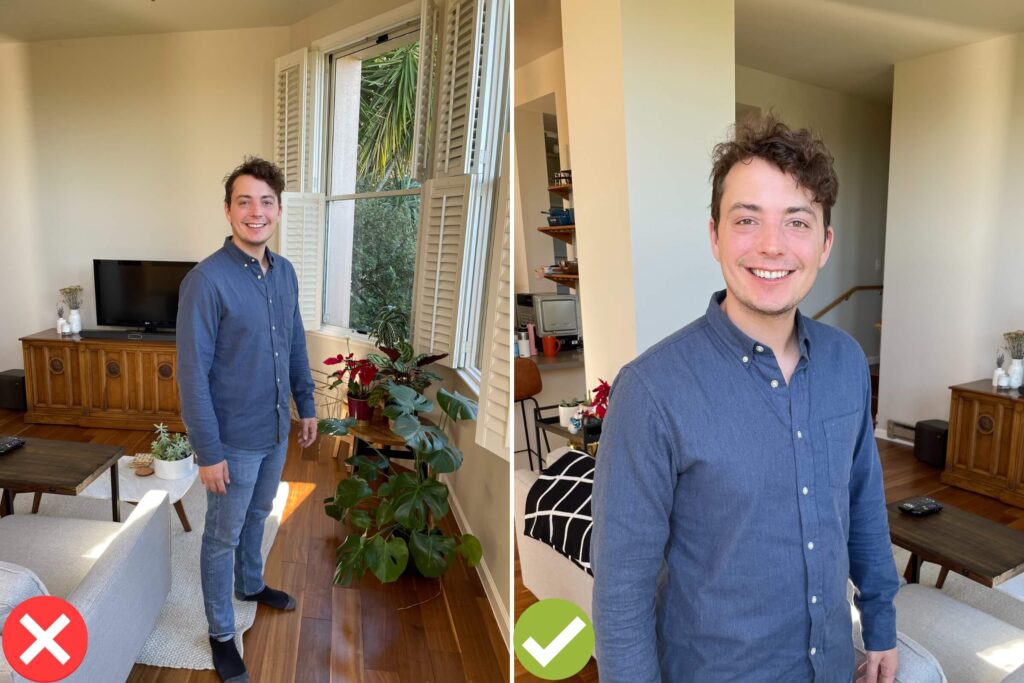
If you’re taking the photo as a selfie, turn the camera HORIZONTAL and make sure the bottom of the photo reaches the bottom of your ribs like the example below:
Phone Height:
The phone should be at approximately eye level. If you find a higher angle more flattering, you can go to the top of your forehead, but we wouldn’t recommend going any further.
Phone Angle:
The camera should be slightly tilted downwards. If you tilt the camera too far down, the lens may distort your facial features in the photo. So, make sure to tilt it at most 15 degrees. You should never have the camera tilted upwards for your photo.
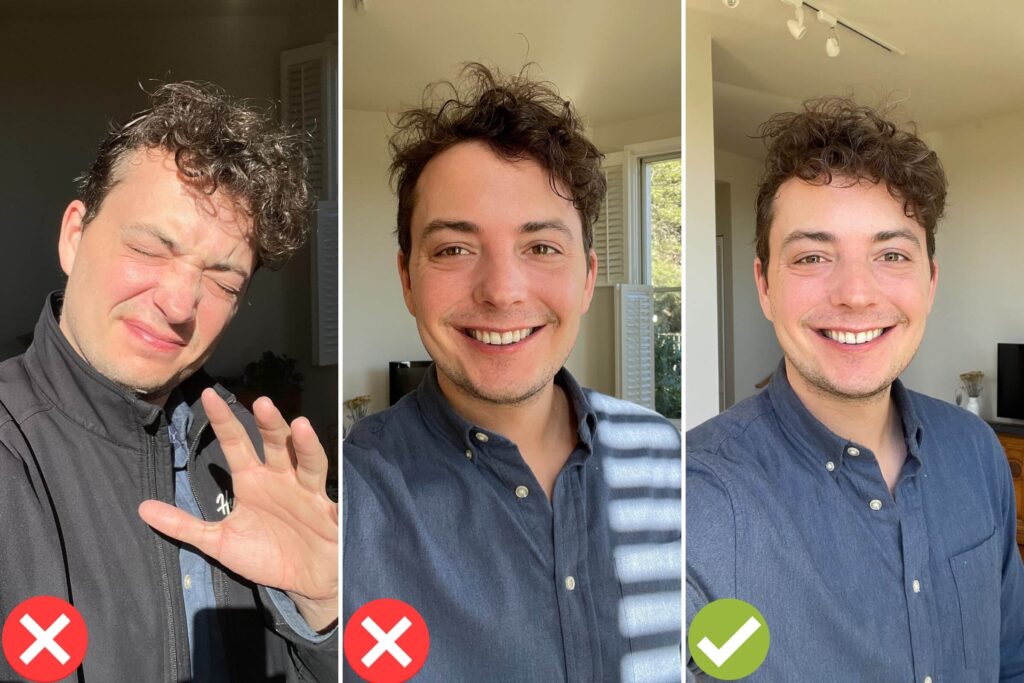
Expressions:
We recommend trying some photos smiling, some photos with a smile with no teeth, and some photos with no smile.
For smiling photos, think of some good memories and then smile right before you take the photo. Don’t try to hold a smile for multiple photos, as the expression will become fake over time. Don’t be afraid to try this process 20 or more times before you get a smile you’re happy with … as this is exactly what we do at our professional headshot studio.
For smiling photos with no teeth showing, slightly pull on one side of your mouth and slightly squint your eyes (described below) for your photo. You should look welcoming without looking “forced” or “overeager”. Again, feel free to try this many times before you find a soft smile you’re happy with.
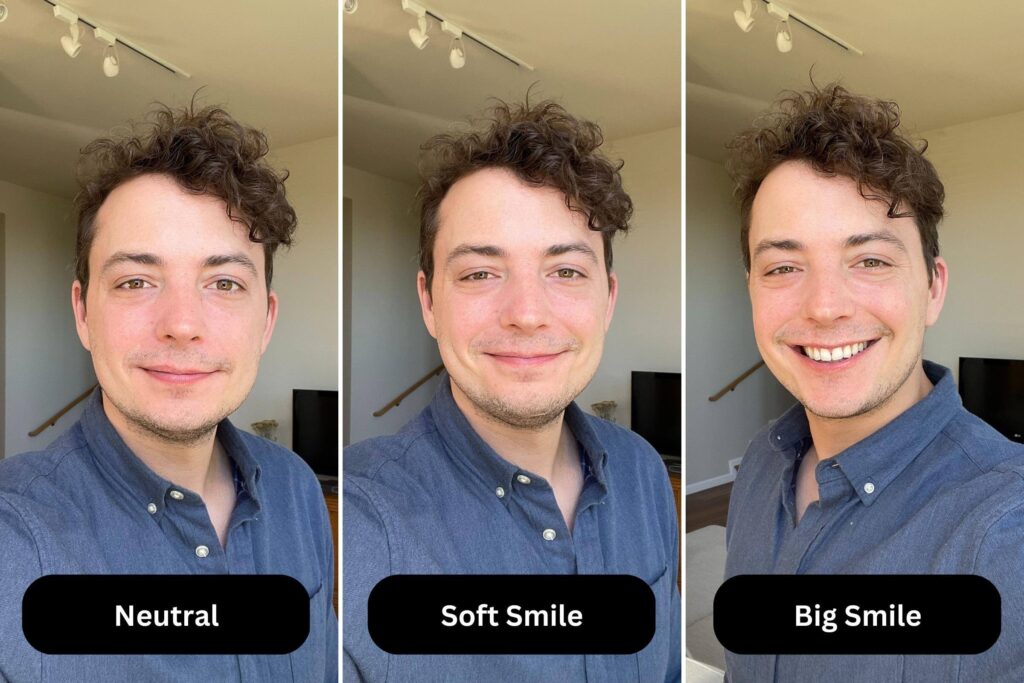
For photos without a smile, you want to look strong and confident. In order to do this, you should very slightly activate your eyes by “squinting” as if you were listening to a coworker at a meeting. A blank stare will look odd, so a bit of squint in your eyes will make you look more engaged in your photo.
Do You Have to Smile for Your Photos?
Probably. If you REALLY don’t feel like smiling in your photo, a forced smile won’t look good. However, many research studies like this one show that you look more like-able, competent, and influential if you smile in your photo.
So decision is yours, but by smiling, you’re probably more likely to make a good first impression with your professional profile photos.
How to Pose For Your Professional Headshots at Home:
We’re used to sitting hunched over our desks and phones, so make sure to keep your back straight and shoulders back as much as possible.
Typically, leaning toward the camera like in the diagram below will be most flattering. Don’t stand flat footed, or with your weight on your back foot, as that will highlight your chin.
If you have a preferred side of your face for photos, make sure to submit a photo on that side. If you don’t know, then take three photos of yourself at the beginning of your shoot. Review the photos side-by-side and you may discover that you have a preferred side.
When posing, try not to tilt your head to one side. While a small amount of tilt can look a bit more friendly/casual, too much tilt looks unprofessional.
Here are some simple poses you can try: How to Pose for Professional Headshots
Once you know if you have a preference on expression and side of face, try running through the below poses for a bit of extra style in your photo. (Although, there’s nothing wrong with simply keeping your hands straight down either.)
How Many Photos Should You Take?
Take at least 20 photos. You may be uncomfortable in front of the camera, but avoid the temptation to take one photo and then quit. The more options you have, the better your chances of capturing a photo that you actually like.
Try a couple poses, and try a couple locations that fit the criteria in Step 2.
Try several photos with a full smile, half smile, and neutral expression.
The more options you have, the better your chances of capturing a professional photo that actually like.
Step 5: Professional Headshots At Home Checklist
Okay, that was a lot of steps! 😅
Once you have a photo you like, run that photo through this checklist:
- Is the photo is in focus?
- Is the photo NOT in portrait mode or another mode that blurs the photo’s background?
- Are both of your shoulders showing in the photo?
- Is your camera lens clean, or is the photo “smudged”?
- Are there any electrical lights turned on around you, which may be turning your skin yellow or green?
- Are there any shadows on your face, or is the lighting on you even/smooth?
- Do you like your appearance in the photo? (Check that collar, jewelry, and hair are in place.)
- Is the photo taken from a flattering angle? (From eye or forehead height)
- Is your head straight?
- If wearing glasses, is there minimal glare on your glasses.
If you passed this checklist, you’re ready to go to the next step!
Step 6: Get Your Smart Phone Professional Headshot Edited
Here’s where the magic happens!
HeadShots Inc is happy to offer Virtual Headshot Packages ($49) where we can transform your DIY professional headshot into a real professional headshot that looks like it was taken at a real photography studio.
As part of that process, we will:
- Verify that your photo meets the guidelines to be a great professional headshot
- Edit your photo for contrast, lighting, and other factors to make it look like it was taken with a professional camera. If you’ve taken your photo with a camera at home, we can also touch it up to make it even better.
- Retouch (aka editing done by hand) your photo to remove distracting elements like acne, stray hairs, bags under eyes, and yellow teeth.
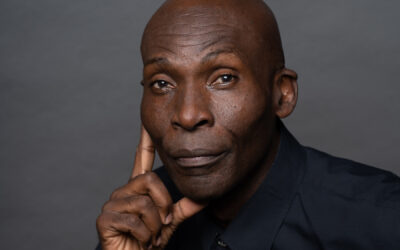
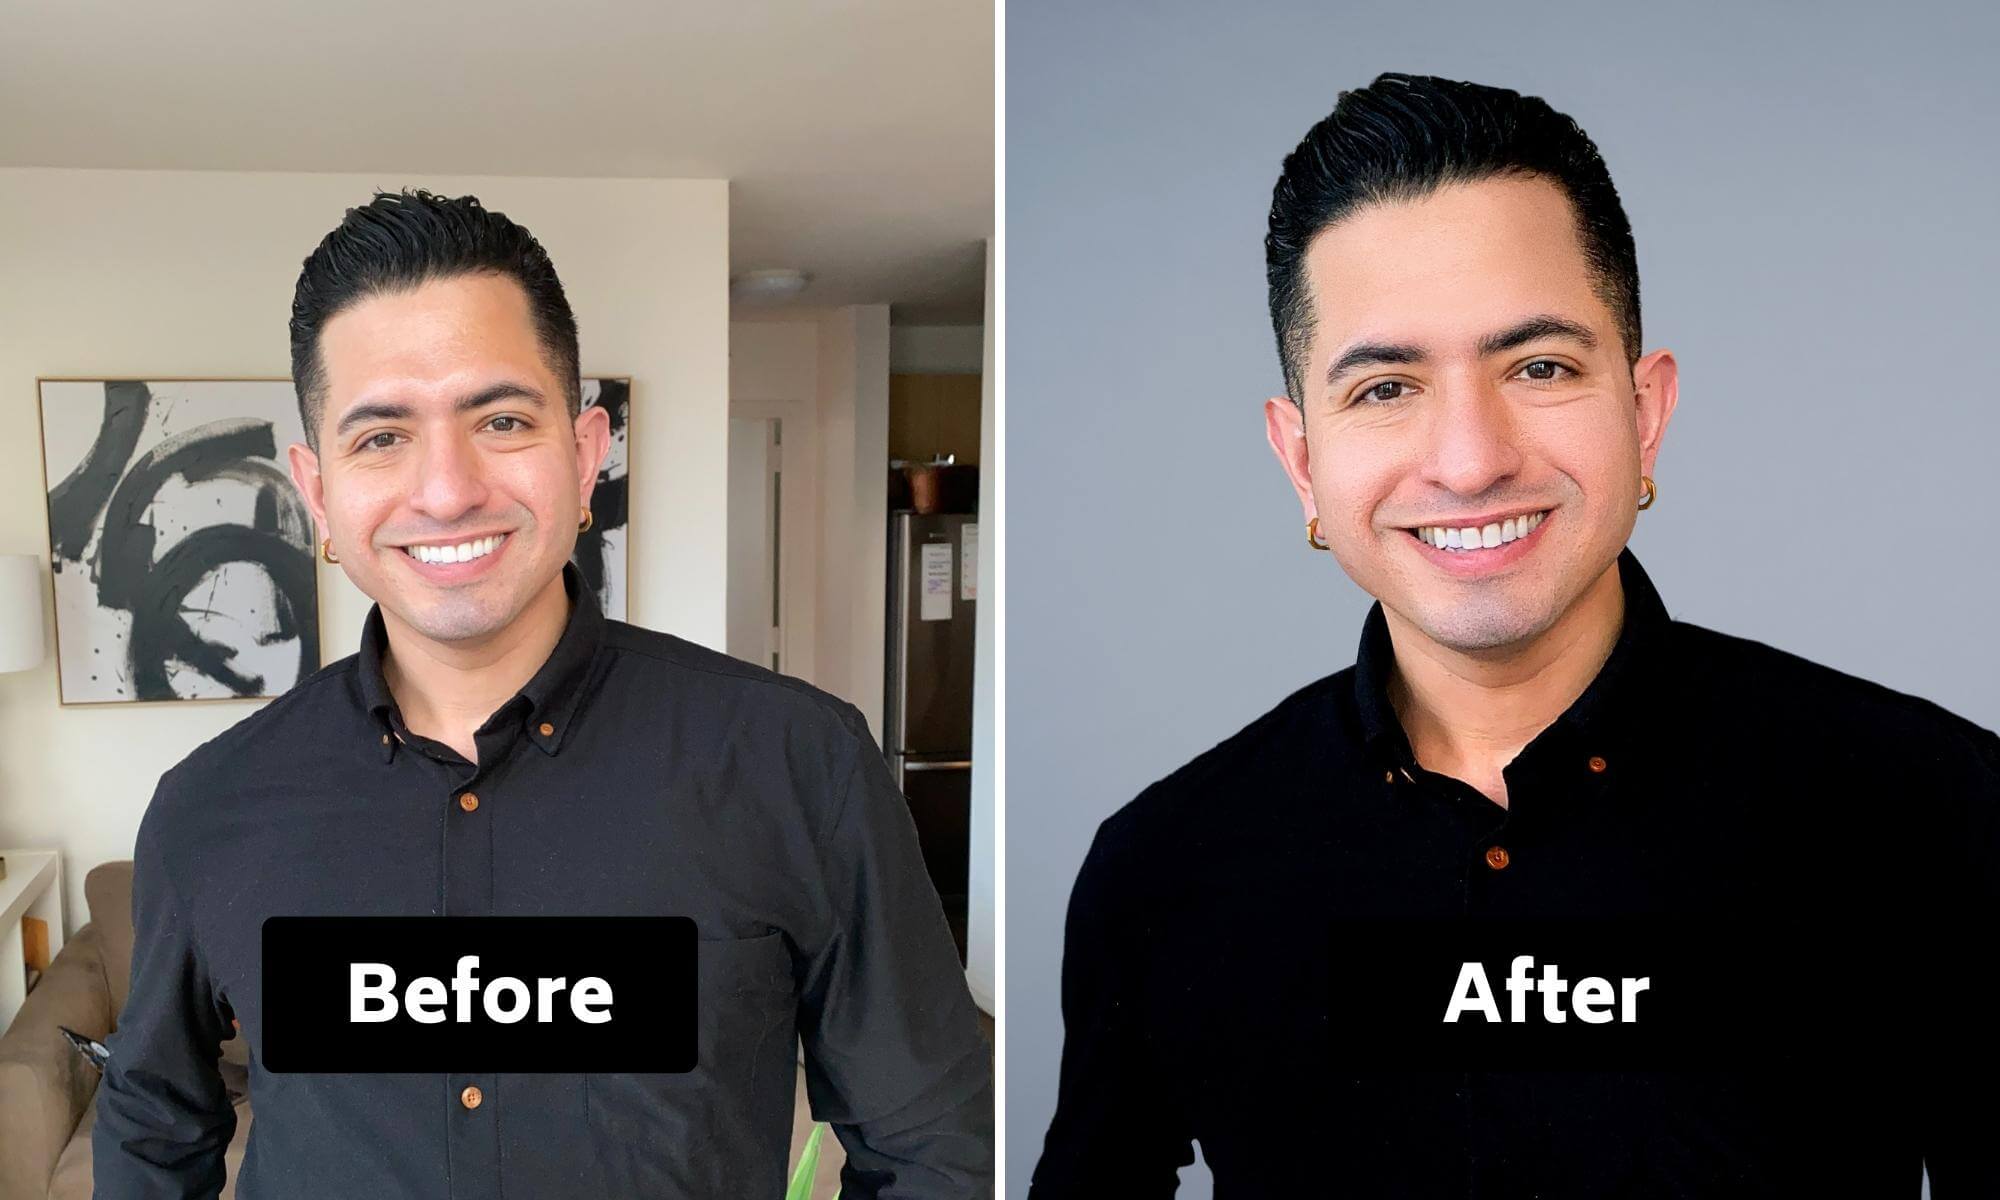
- Replace the background with one of +20 options. Options including plain studio backgrounds (like the example below) and “blurry city” or “blurry office” photos that have been tailor-made for work profiles.
- Three (3) day turnaround time on the above edits. Upgrade to overnight editing for an additional $45.
- 100% Satisfaction Guarantee: Unlimited revisions and redos within 30 days of your order.
Interested? You can purchase a package and get started on our Virtual Headshot Services page, and we’ll happily get to work.
This code will only work for the first 30 people who register, so purchase your package today! (You can use it whenever you want in the next year.)
Here is my final photo with our editing process:
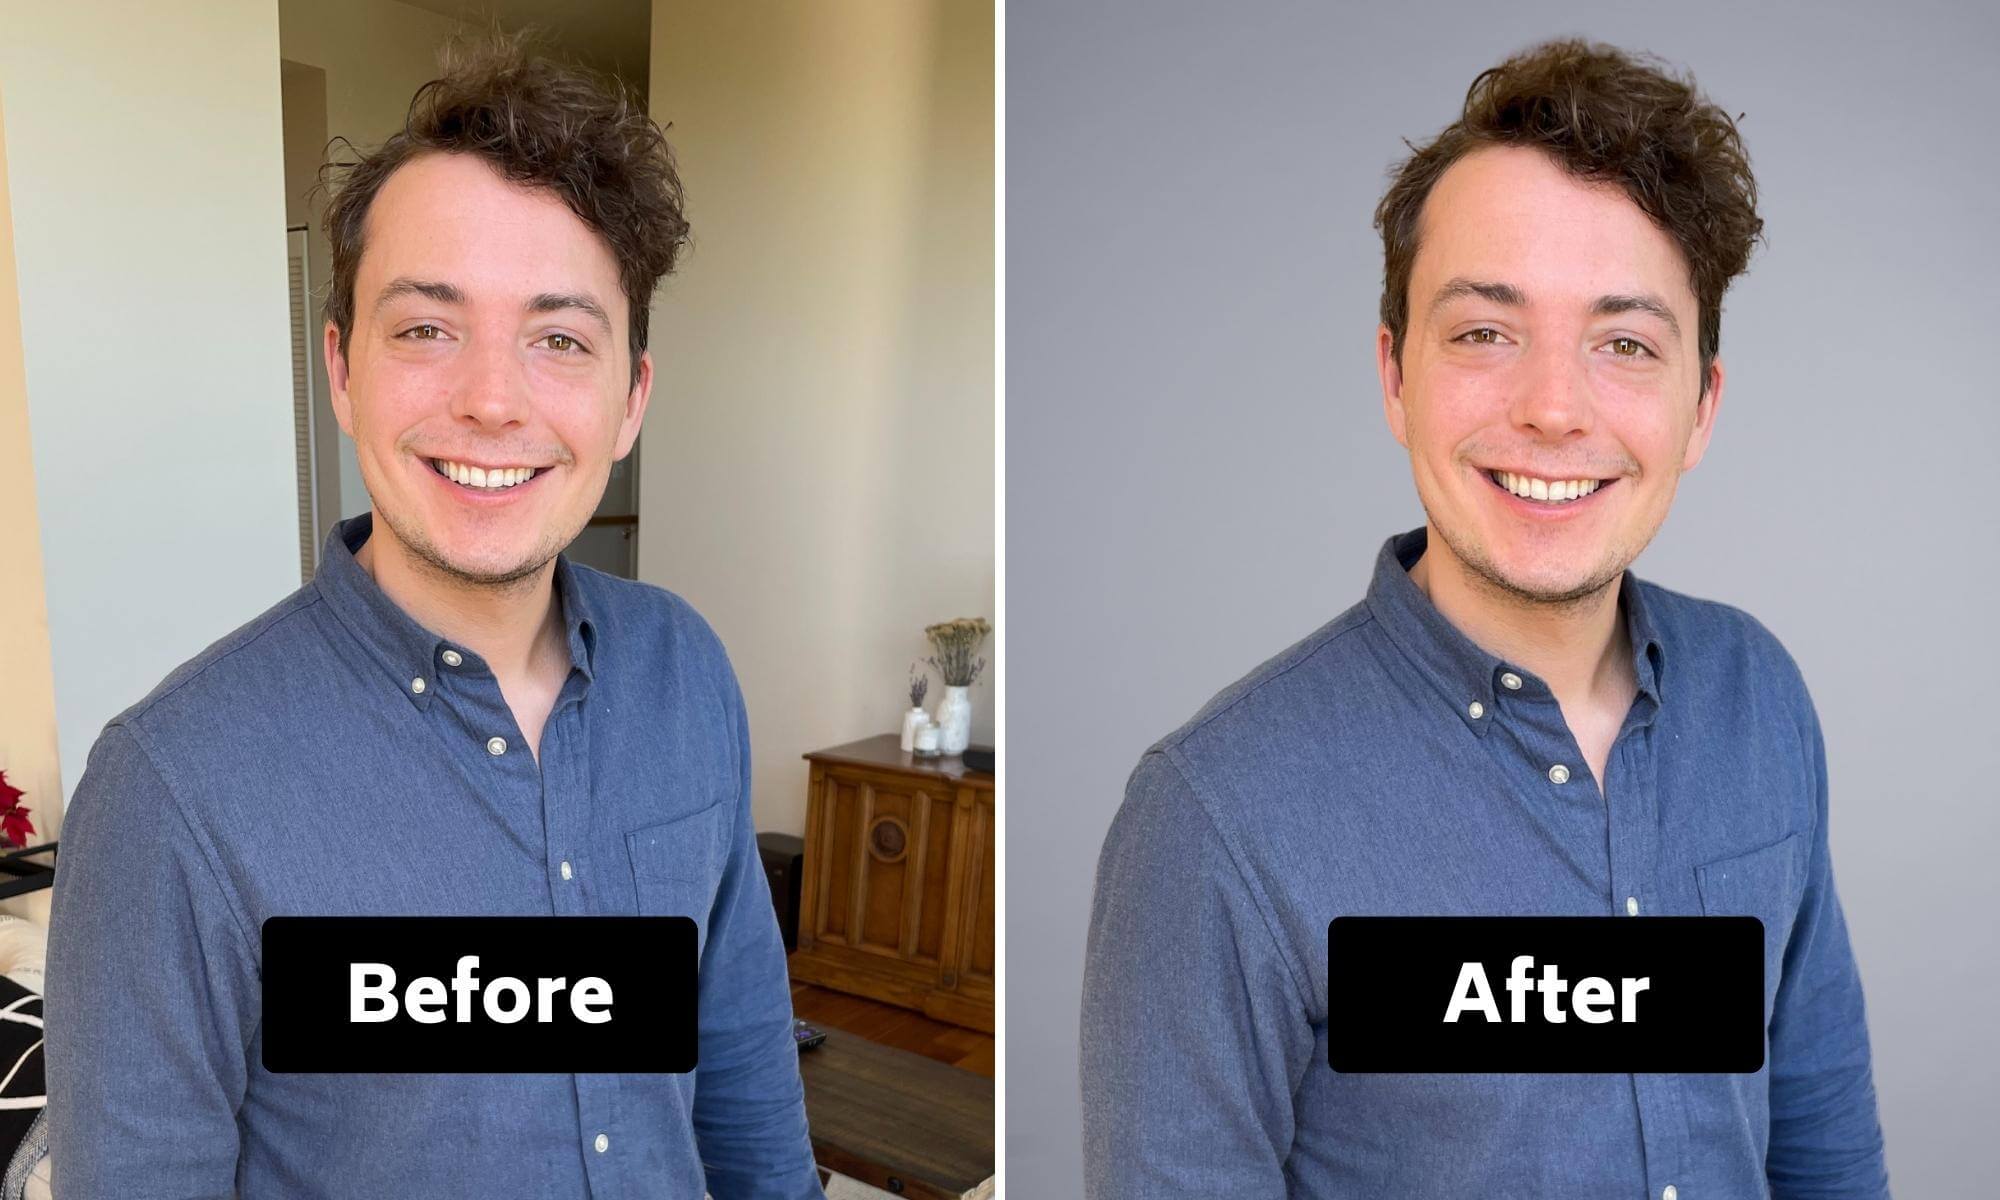
And, here is the final photo on my LinkedIn profile! It looks great!

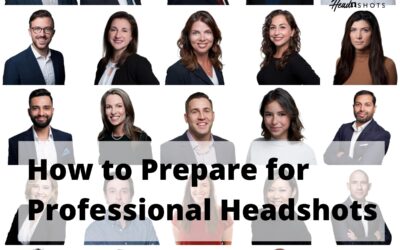
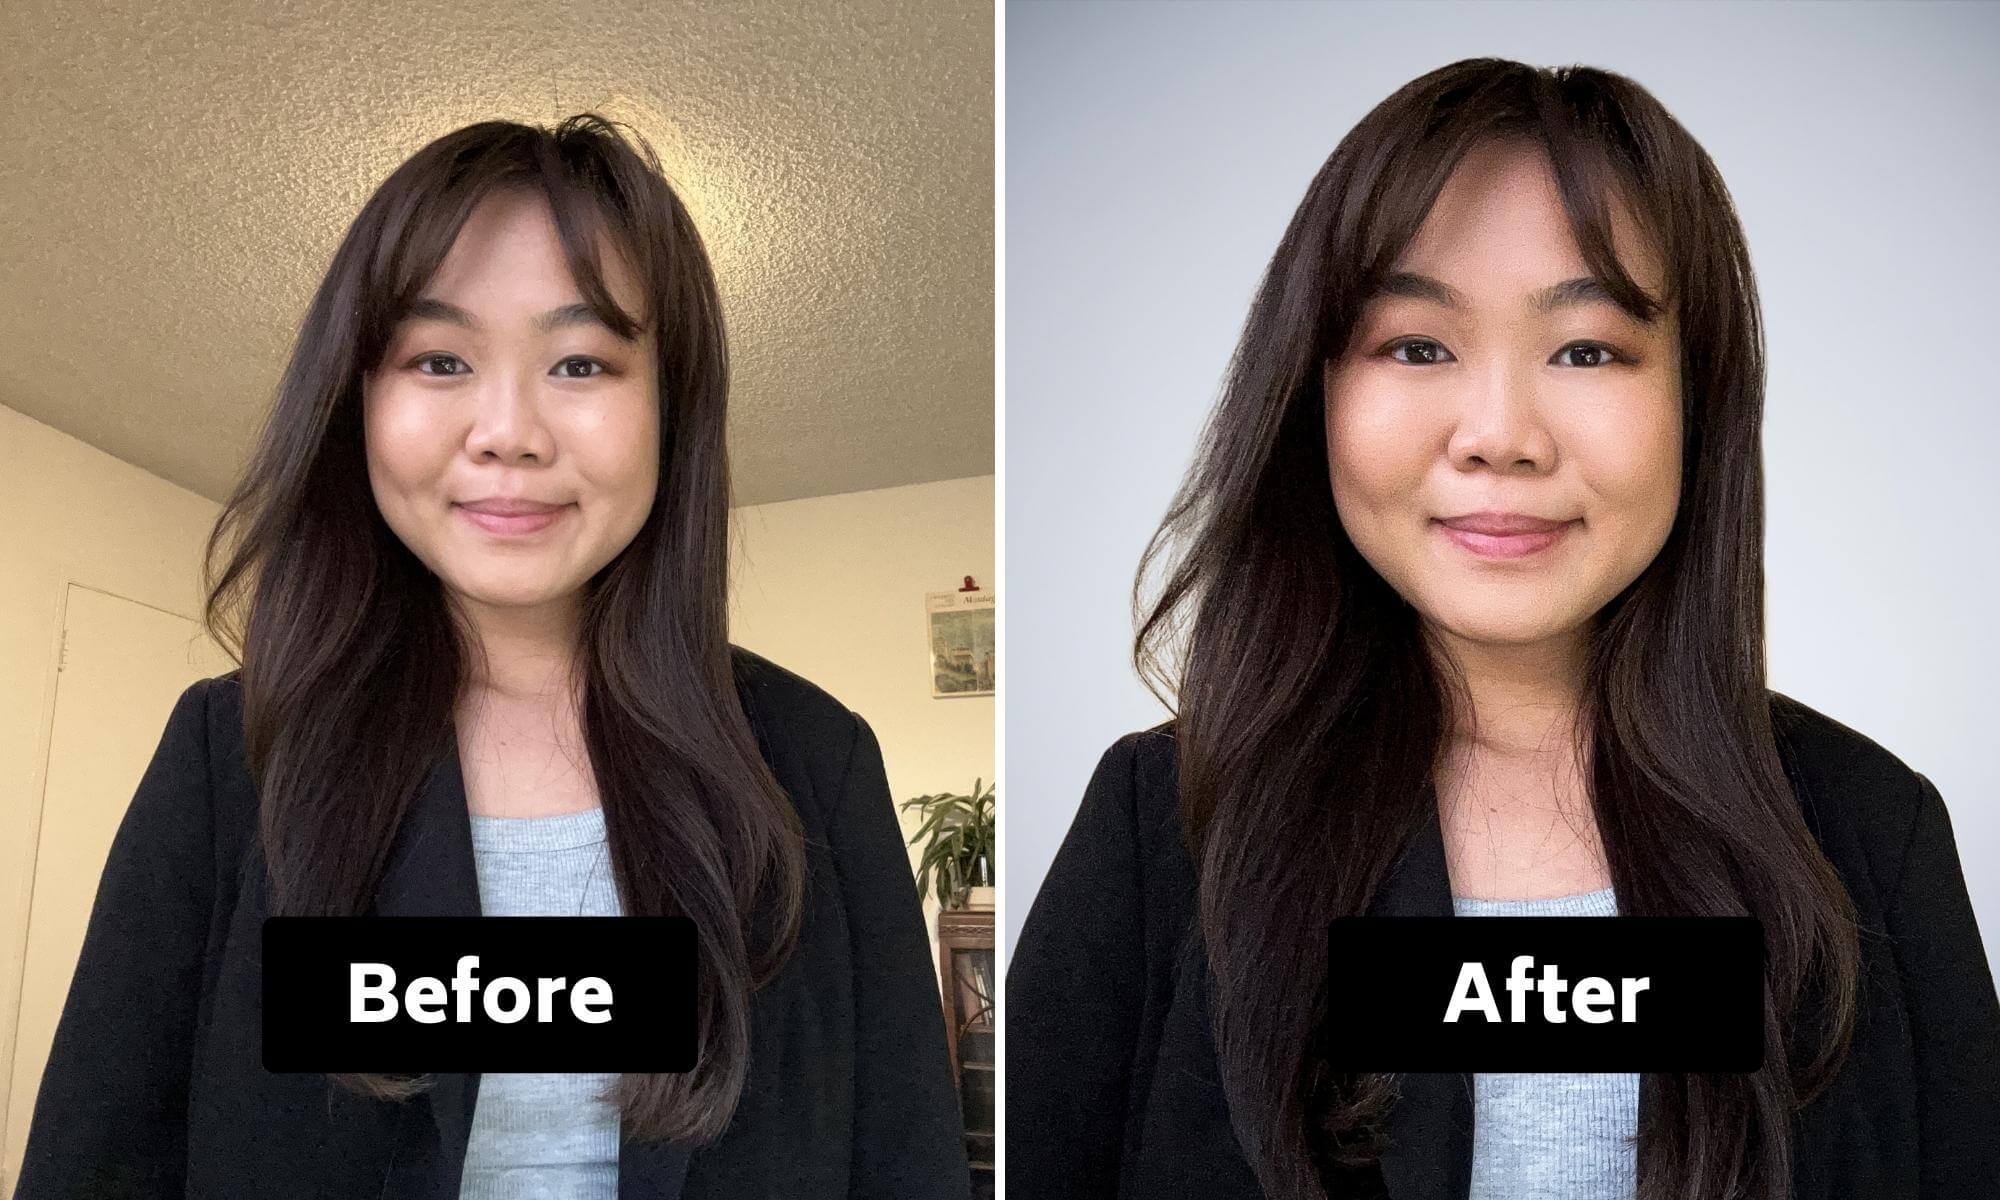
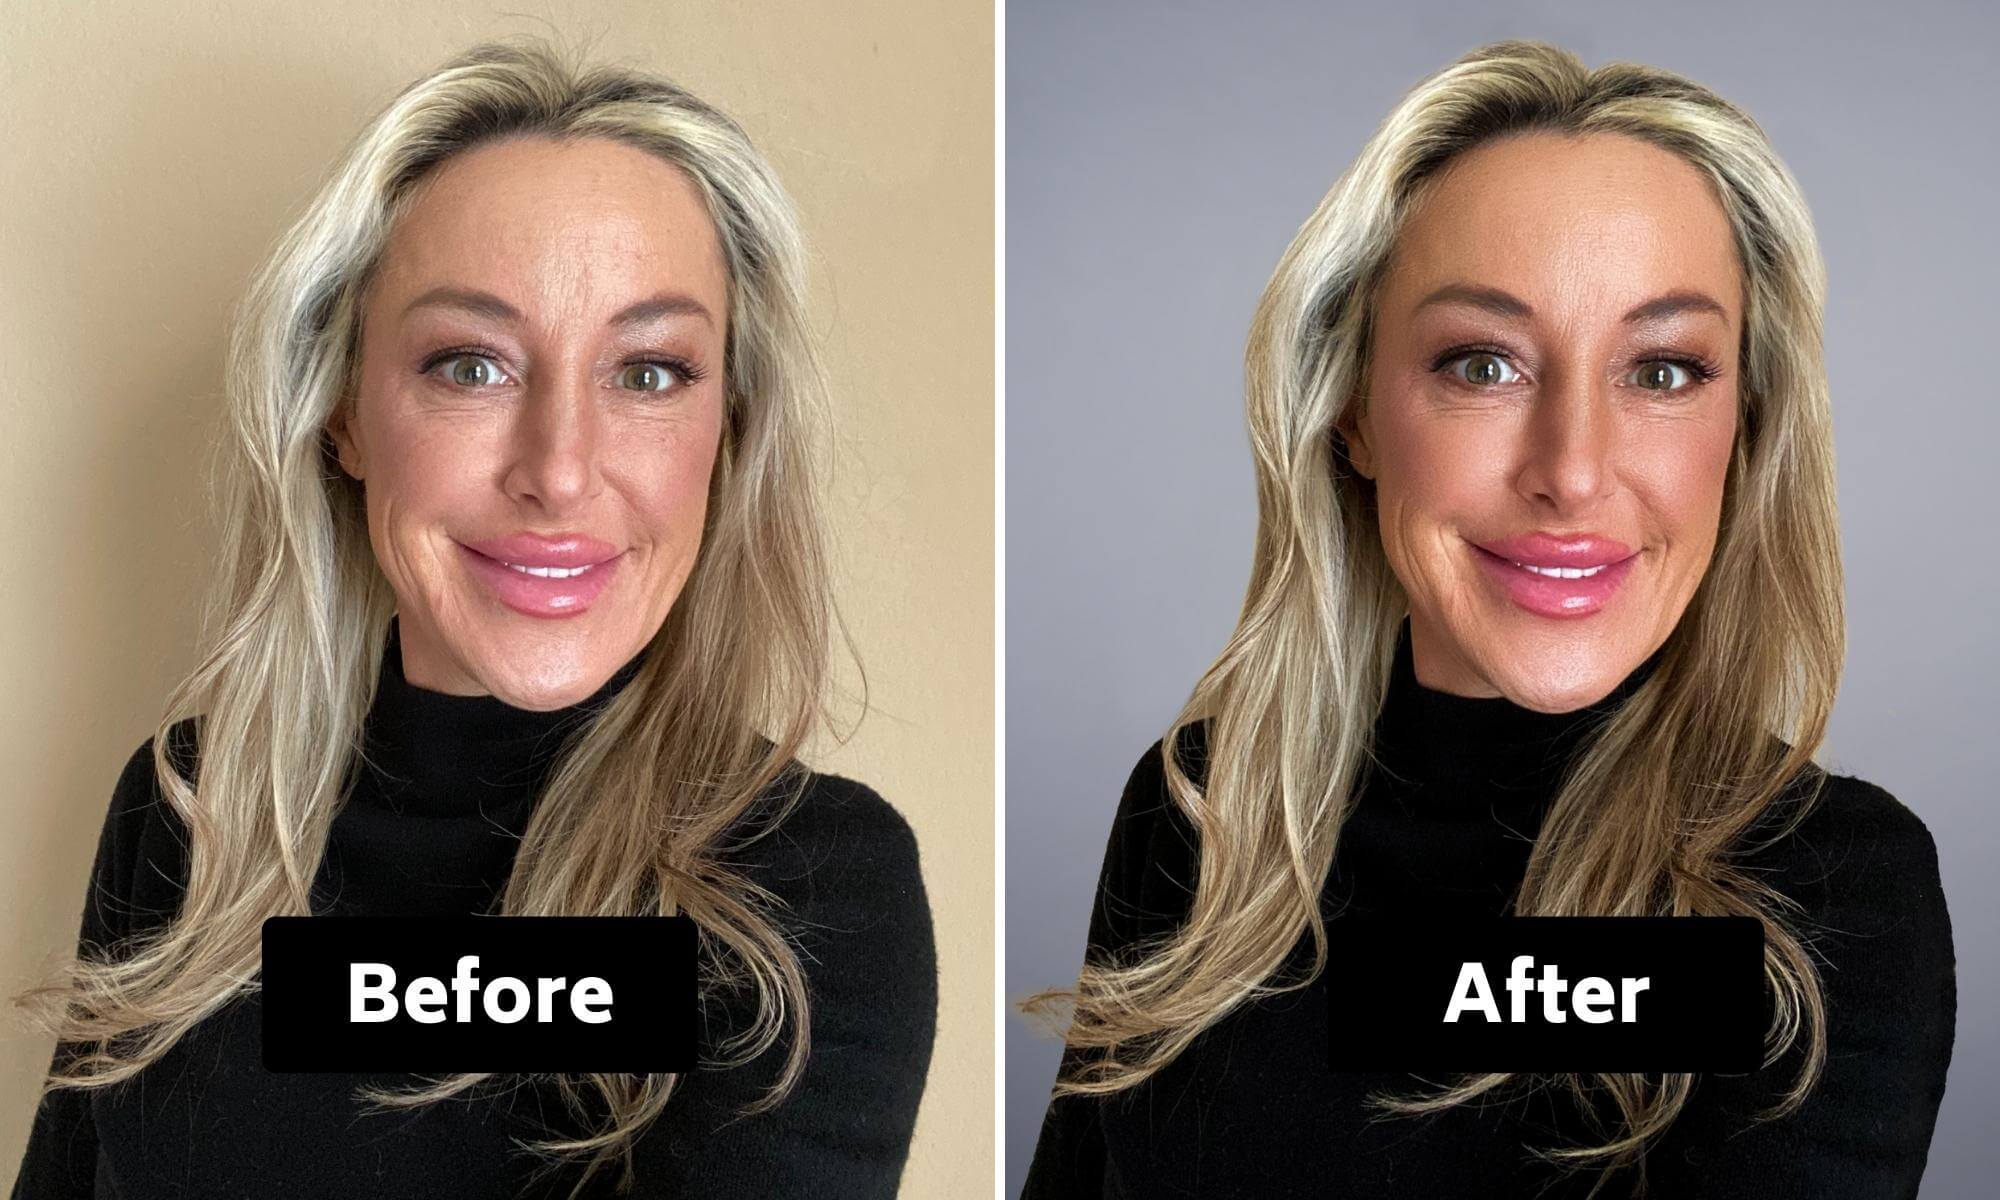
For some added inspiration, here are some other before-and-after photos showing off other customers:
Thanks for reading and we hope to work on your DIY professional headshot soon! With our Virtual Headshot Editing services, your coworkers or employer never know you took these professional headshots at home. We can retouch your photo (white teeth, remove acne, remove stray hairs etc) and replace the background. Packages for individuals start at $49.
Follow this guide and you’ll have an AWESOME headshot for job applications, zoom meetings, and your LinkedIn profile.
While we hope this guide was helpful. If you want to work with us in real life, head over to our pricing pages for Individual Sessions or Team Sessions.
Thanks for reading!